CSS Basics and Selectors
Objectives
- Describe the syntactical and functional relationship between selectors, properties, and values
- Style all elements of a particular HTML element on a web page
- Describe the difference between class and id selectors
- Apply styles to specific elements by selecting elements with classes and ids
- Apply a set of styles to children of a specific class or tag
What is CSS?
If HTML is a set of instructions telling the browser what to display, CSS tells it how to display it.
CSS stands for:
- Cascading
- Style
- Sheets
It provides the browser with precise instructions on how to style each element we want displayed on the page and can affect the text format - like font, size, color - the size and position of various objects on the page, colors, spacial layouts, etc. There are literally hundreds of different properties we can use to style HTML elements on a webpage.
CSS uses key-value pairs just like html attributes. For example, to set the background colour of an element to red, we would use
background-color: red;
Adding CSS
There are three different ways to use CSS to style your HTML:
- Inline style
- External style sheet
- Internal Style sheet
Let's take a look at each one with a small codealong:
- We'll create a new folder with a HTML page:
$ mkdir css-basics
$ cd css-basics
$ touch index.html
- Then we'll add a basic HTML structure to your
index.htmlfile:
<!DOCTYPE html>
<html>
  <head>
    <meta charset="UTF-8">
    <title>Intro to CSS</title>
  </head>
  <body></body>
</html>
Inline CSS
If you're looking to add a unique style for a single HTML element, you can use an inline style. It can also be used to test different styles, initially, or for quick fixes, as it's much easier to change a single element on the page than to find and change the source CSS file.
To use inline styles, add the style attribute to the relevant tag. The style attribute can contain any CSS property. We can change the HTML body's background to red:
<!DOCTYPE html>
<html>
  <head>
    <meta charset="UTF-8">
    <title>Intro to CSS</title>
  </head>
  <body>
    <p style="background:red">Text!</p>
      <p style="background:red">More Text!</p>
  </body>
</html>
Note the inline style using the style property:
<p style="background:red">Text!</p>
We can add any number of styles:
<p style="background:red; border: 1px solid black">Text!</p>
Open the HTML file in browser and let's see what we have - a red page!
Inline CSS has a lot of downsides, though, so try to avoid using it on your projects and during class (we will discuss this further down in specificity).
Style Sheets
As opposed to styling every element individually, we can use style sheets. Style sheets work based on rules that tell the browser what styles to give to which elements. They can be written in your HTML (internal) or in a separate CSS file (external). Whatever style sheet you use, the CSS syntax is the same.
There are two main parts to a CSS rule
- selector: the part that specifies what element you want to style. Usually an HTML tag, class or ID
- declaration: the property and value that you want the element to have
selector {
  property_1: value_1;
  property_2: value_2;
}
Do not forget the curly brackets or the semi-colon after the value!
Internal Style Sheets
If a single page has a unique style, you could use an internal style sheet - these are defined and written in your HTML using the <style> element, inside the head section of an HTML page:
<!DOCTYPE>
<html>
  <head>
    <style>
      p {
        background: red;
      }
      body {
        background: black;
      }
    </style>
    <title>Intro to CSS</title>
  </head>
  <body>
      <p>Text!</p>
      <p>More Text!</p>
  </body>
</html>
Using selectors, we can style multiple elements using just one rule! If we used inline styles, we'd have to style every element individually.
External Style Sheets
In nearly all applications, most of your CSS will be written in an external style sheet. Websites usually have multiple pages that share a similar set of styles. External style sheets allows all your entire website to use the same set of styles just by including another file! That's really powerful and helps keep your code organized and separate.
To link the stylesheet to the HTML file, inside the <head> tags, we need to add a self-closing <link> tag, indicating the type of relations (rel="stylesheet") and the file path. But first, let's create a css directory and put a new css file in it.
mkdir css
touch css/style.css
We often use multiple css files in one application, so it's a good idea to have a specific folder for stylesheets, and we're doing that now with our /css folder.
Then we can move the CSS from our internal style sheet to our external style sheet and add the file path (href="style.css") to our HTML file:
<!DOCTYPE html>
<html>
  <head>
    <meta charset="UTF-8">
    <title>Intro to CSS</title>
    <link rel="stylesheet" href="style.css">
  </head>
  <body>
    <p>Text!</p>
      <p>More Text!</p>
  </body>
</html>
Your style.css should look like this:
p {
  background: red;
}
body {
  background: black;
}
Important note on style sheets
Style sheets almost always go in the <head>. Remember that HTML documents are always rendered from top to bottom, so if you place your style sheet at the bottom of the page, it is possible for all of your content to be rendered without your styles. This is especially acute if your users have a slow internet connection.
Selectors
CSS has a mind-boggling number of selectors (see the full list at http://www.w3schools.com/cssref/css_selectors.asp). We'll focus on the most common selectors:
- element
- class
- id
and some useful concepts: -
- nesting
- child selector
Element
If you've been following the code along, you should already be somewhat familiar with the element selector.
element{
  property: value;
}
The element selector selects all elements of that type. As as result, they tend to be too general. Fortunately, we have ways of making better, more specific selections.
Class
The class selector finds elements with a specific 'class'. Classes are intended to describe a general group of elements.
First, we assign classes to our elements like so:
<p class="class-name"></p>
Then we select a class by writing a . in the selector:
.class-name{
  property: value;
}
Note that:
- You can use the same class on multiple elements
- You can use multiple classes on the same element
This means that classes are really useful for styles that you want to replicate over and over. Here is an example:
<!DOCTYPE html>
<html>
  <head>
    <meta charset="UTF-8">
    <title>Intro to CSS</title>
    <style>
      /* Our class selectors */
      .bg-red {
        background: red;
      }
      .white {
        color: white;
      }
    </style>
  </head>
  <body>
    <!-- We can reuse classes to apply the same styles on different elements-->
    <h2 class="bg-red">Using our classes</h2>
    <p class="bg-red">The selector works here too</p>
    <!-- We can also mix and match classes to apply multiple sets of styles at the same time-->
    <p class="bg-red white">I have two classes</p>
  </body>
</html>
Id
The id selector targets one specific element using its id. Take note that ids are intended to be unique (as opposed to classes)!
You give ids in a similar manner to classes
<p id="id-name"></p>
Then we select the id by writing a # in the selector:
#id-name{
  property: value;
}
Remember:
- An id is unique within a page.
- You should use the id selector when you want to find a single, unique element.
While it is possible to give the same id to multiple elements, this will cause problems literally everywhere (HTML, CSS and JS).
It is generally considered good practice that you use class selectors over id selectors. Just like inline styles, we will cover the specifics of this in specificity.
Nesting
Using the individual selectors, we can apply styles to every single element on our page. But imagine how tedious it would be to come up with class names and ids for every single element on your page😱
Just as how HTML allows us to nest elements in elements, CSS allows us to select an element based on what it's nested inside like so:
outer-element inner-element{
  property: value;
}
We can mix and match any of the selectors we learned previously, so for example, to select a <p> inside an element with class special-box:
.special-box p{
  property: value;
}
Nested selectors are really powerful because they allow us to simplify our CSS rules a lot. We'll compare two small examples with and without nesting:
Without nesting, we have to come up with a bunch of class names
<!DOCTYPE html>
<html>
  <head>
    <meta charset="UTF-8">
    <title>Intro to CSS</title>
    <style>
      .special-box {
        background: red;
      }
      .special-box-heading {
        color: white;
      }
      .special-box-text {
        color: gray;
      }
    </style>
  </head>
  <body>
    <div class="special-box">
        <h1 class="special-box-heading">Heading</h1>
          <p class="special-box-text">Text</p>
    </div>
  </body>
</html>
With nesting, we can simplify some things.
<!DOCTYPE html>
<html>
  <head>
    <meta charset="UTF-8">
    <title>Intro to CSS</title>
    <style>
      .special-box {
        background: red;
      }
      .special-box h1 {
        color: white;
      }
      .special-box p {
        color: gray;
      }
    </style>
  </head>
  <body>
    <div class="special-box">
      <div>
        <h1>Heading</h1>
        <p>Text</p>
      </div>
    </div>
  </body>
</html>
Note that nested selectors work no matter how deep the nesting is. Use this fact to your advantage when styling complicated HTML elements.
The caveat here is that as you nest more and more selectors, the browser will take more and more time to find the element you actually want to select. One level of nesting is generally ok, avoid anything more.
Child Selectors
Child selectors work similarly to nested selectors, except that they only select the direct child like so.
Child selector use this format:
parent > child{
  property: value;
}
<!DOCTYPE html>
<html>
  <head>
    <meta charset="UTF-8">
    <title>Intro to CSS</title>
    <style>
      .special-box {
        background: red;
      }
      .special-box > h1 {
        color: white;
      }
      .special-box > p {
        color: gray;
      }
    </style>
  </head>
  <body>
    <!-- this works -->
    <div class="special-box">
        <h1>Heading</h1>
          <p>Text</p>
    </div>
    <!-- this doesn't -->
    <div class="special-box">
      <div>
        <h1>Heading</h1>
        <p>Text</p>
      </div>
    </div>
  </body>
</html>
Multiple Selectors (and Specificity)
Since it is possible for one element to be affected by multiple CSS rules, it is certainly possible for some of these rules to conflict. Take for instance:
<!DOCTYPE html>
<html>
  <head>
    <meta charset="UTF-8">
    <title>Intro to CSS</title>
    <style>
      #blue{
        color: blue;
      }
      .red {
        color: red;
      }
    </style>
  </head>
  <body>
    <!-- We have #blue and .red, which both give different colors!-->
    <p id="blue" class="red">I'm blue, BUT WHY?!?!</p>
  </body>
</html>
CSS uses a set of rules to determine what styles an element gets. Broadly, these are (in descending order of precedence):
!importantdeclaration- specificity
- ordering
!important declaration
.red {
  color: red !important; /*this is important, this will override*/
}

.white{
  color: white;
}
If you declare a rule to be !important, it overrides all normal rules. Use !important with caution because you may unknowingly override other CSS rules that you might need in the application.
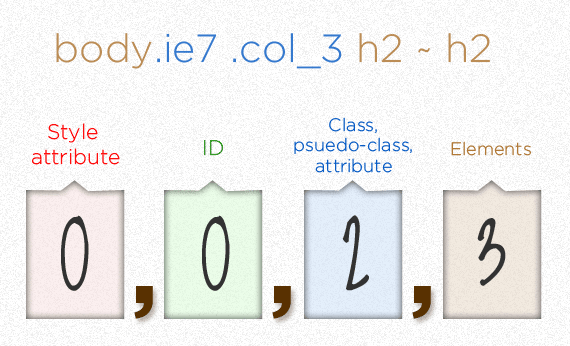
Specificity
Every selector has its place in the specificity hierarchy, and if two selectors apply to the same element, the one with higher specificity wins. Overall, there are four distinct factors that define the specificity level of a given selector:

Using this ordering:
- an inline style has higher precedence over a selector with an id
- an id selector has higher precedence than a class selector
- etc
It may be helpful to think of specificity as a number, and the selector with the highest specificity wins (a CSS Specificity Calculator is especially helpful for this). Some examples are:

This is the reason why #id selectors and inline styles are generally not recommended - they are too specific. There is a tendency for these styles to override other styles that you might need.
Ordering
If ther are two styles with the exact same specificity, the last rule defined overrides any previous, conflicting rules. This applies across all style sheets, whether external or embedded (internal).
NOTE: Some resources state that embedded styles have precedence over external style sheets. You can test this for yourself, it's not true.
This means that in all of these cases, the <p> will be red:
Both embedded:
<!DOCTYPE html>
<html>
  <head>
    <meta charset="utf-8">
    <style>
      .white {
        color: white;
      }
      .red {
        color: red;
      }
    </style>
  </head>
  <body>
    <p class="red white">I am red</p>
  </body>
</html>
Embedded vs external:
<head>
  <style>
    .white {
      color: white;
    }
  </style>
  <link rel="stylesheet" href="red.css">
</head>
Writing the exact same selector:
<head>
  <style>
    p {
      color: white;
    }
    p {
      color: red;
    }
  </style>
</head>
Debugging with Chrome Dev Tools
Chrome Dev Tools has an great set of tools for modifying and editing CSS. In this section, we'll use the inspector view (Google has a great walkthrough at https://developers.google.com/web/tools/chrome-devtools/iterate/inspect-styles/?hl=en).
We'll change the color of an element in a small exercise:
On http://generalassemb.ly do one of the following:
Press
⌘ + SHIFT + copen dev tools with any other shortcut, then click the
right-click on the page and select "Inspect Element" at the bottom
Using this inspector view:
Select the navbar
Look at the HTML element on the left hand side to be certain (it should look like
<div class="navi-banner">)Click around the styles on the right
In the right hand side Styles tab, add this new style to the navbar
element.style {
  background: red;
}
Since our browser is rendering the page, we can make it render whatever styles we want! We replaced their styles with a solid red background-color. But notice if you refresh your page, everything is gone!
This CSS editor has all kinds of cool features:
- As you start typing the property name (like
background), the css properties autocomplete - If you type a valid color, a little colored box will show up
SHIFTclick on the colored box to change the color format (RGBA, Hex, etc.)- Click on the colored box to get a color selector
- You can copy and paste styles from the editor to your text editor
- Use up/down arrow to increment/decrement values by one
- Use
⌥ + ↑or⌥ + ↓to increment/decrement by 0.1 - Use
SHIFT + ↑orSHIFT + ↓to increment/decrement by 10
Feel free to play around with the styles on your browser as these will come in handy for every one of your projects!
Conclusion
CSS can be really fun or a total nightmare. You have to remember a few rules, but once you have them remembered, it's great to see your webpage come to life as you imagined.
- Describe the differences between classes and IDs.
- Identify the popular CSS properties we used today.
- What are the use cases for inline styling vs. internal/external style sheets?